OPTIONS AND SETTINGS
How do I Configure Options and Settings?
TRAIN TRACK® includes a number of options and settings that may be configured for each individual user, and others that can be configured for all users by the Administrator. This section describes the options and settings which you may configure for TRAIN TRACK®. NOTE: The graphic symbols may appear different depending on the version of Access® you are using.
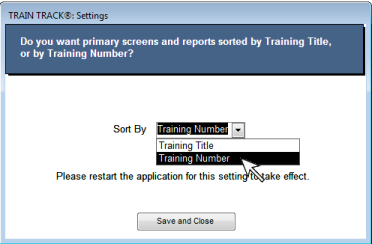
Training Sort Order
You may set TRAIN TRACK® to sort training records by Training Title or by Training Number. Once you have made your selection, the records will be sorted that way on all screens and reports. If you find it easier to locate a training by the number instead of the title, then select to sort by Training Number. If you would rather find records by the Training Title, then select to sort by title. This setting may be set individually for each client workstation.
To select the training sort order, follow these steps
| 1. From the ribbon, Options and Settings tab, select Training Sort. | |
|---|---|
| 2. A box will open. Click the arrow in Sort By to open the drop-down menu. From the drop-down menu, select "Training Title" or "Training Number". | |
| 3. Click Save and Close. |
Your records will now be sorted based on your selection on screens and reports.
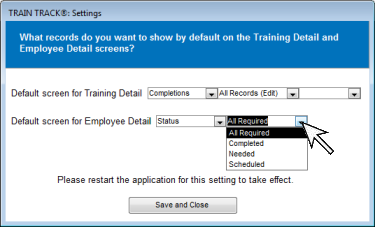
Default Screens for Training Detail and Employee Detail
You may select the screens to show by default when you open Training Details or Employee Details. You may select from any of the available screens. Once you make your selection, that screen will open each time you open the page. This setting can be set independently for each client workstation.
To select default screens, follow these steps
1. From the Ribbon, "Options and Settings" tab, select Detail Screens. A box will open.
2. Click on each arrow to open the drop-down menu and select the screens you want to see for training records and employee records.
3. Click Save and Close.
The screens you selected will be shown by default each time you open the training detail or employee detail screen.
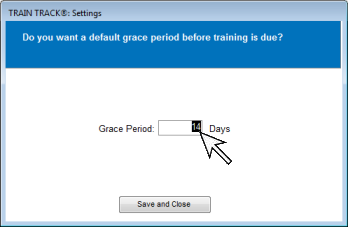
The Administrator user may set the default grace period before training is due for all users. This is the number of days after the training release date, or after their hire date, that training is due, whichever is later. The grace period may be set individually for each training. The default value will be applied to new training.
To set the default grace period, follow these steps
1. From the Ribbon, "Options and Settings" tab, select Default Grace Period. A box will open.
2. Enter the number of days.
3. Click Save and Close.
The default grace period will be applied to new training records.
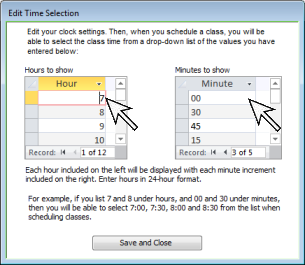
Time Increments for Scheduling Classes
You may set the time increments that are available when scheduling classes. For example, you may only want to select from times during your regular workday, and you may only want to select times that begin on the whole or half hour. Or, you may want a 24 hour clock, with the ability to select in 15 minute increments. This setting may be configured individually for each user.
To set time increments for scheduling classes, follow these steps
1. From the Ribbon, "Options and Settings" tab, select Default Grace Period.
2. A box will open. In the Hour box, add or remove numbers based on the times you want to be able to select from. You must use a 24-hour format. For example, if you want "2:00 pm" to be available, you would add "14".
3. In the Minute box, add or remove numbers based on the minutes you want to be able to select from. Use "00" for whole hours.
4. Click Save and Close.
The times you selected will now be available when scheduling classes.
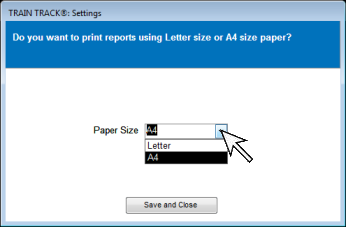
Paper Size Letter or A4
You may select to print reports on letter or A4 size paper. Once you select the setting, all reports will automatically be formatted for the chosen paper size. This setting may be configured individually for each user.
To select the paper size, follow these steps
1. From the Ribbon, "Options and Settings" tab, select Paper Size.
2. A box will open. Select Paper Size.
3. Click Save and Close.
Reports will automatically be formatted for the selected paper size.
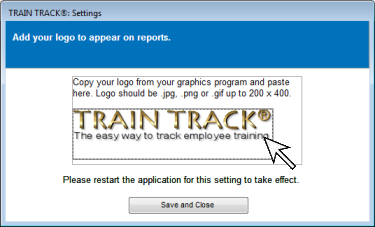
Logo for Reports
The Administrator user may add a logo to use on reports. This is set centrally for all users.
To add your logo to reports, follow these steps
1. Open a copy of your logo in your graphics program. The logo should to be .jpg, .png, or .gif, up to 400 pixels in width and 200 in height. Select the logo and Copy (Ctrl+C).
2. From the Ribbon, "Options and Settings" tab, select Add Your Logo to Reports. A box will open.
3. Select the existing logo and Paste (Ctrl+V).
4. Click Save and Close.
Your logo will now appear on reports.
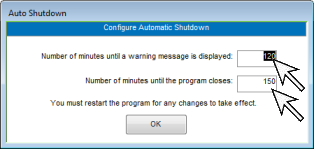
Auto Shutdown
The Administrator user may set the length of time before TRAIN TRACK® shuts down when there has been no activity. This is set centrally for all users.
To set the auto shutdown length, follow these steps
1. From the Ribbon, "Options and Settings" tab, select Auto Shutdown. A box will open.
2. Enter the number of minutes after which you would like to program to alert the user if there is no activity.
3. Enter the number of additional minutes after which you would like to program to shut down if there is no activity. If you enter 15 for the first number, and 5 for the second, then the program will close after a total of 20 minutes of inactivity.
4. Click OK.
TRAIN TRACK® will automatically close after the number of minutes of inactivity indicated.